General: FTP and SFTP
About

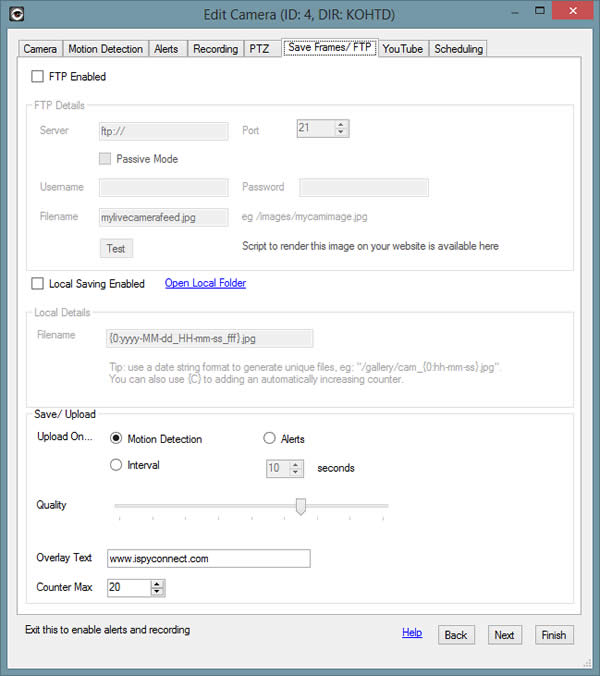
iSpy can FTP frames to any FTP server (or SFTP server) on Motion Detection, Alert or on an Interval. Check the top box to Enable FTP. iSpy can also save files locally using the same naming options as with FTP. Images saved locally are available on the website under the file manager in the grabs folder for the specific camera.
The Server, Port, username and Password are all standard fields needed for FTP. Check the box to use "Passive Mode" - This is sometimes required (try it if uploading doesn't work!).
Filename: This field needs to match your upload location. For example if you are uploading to a subdirector called "images" you'd enter "/images/blah.jpg" here. The actual filename can be formatted with the current date/time. You can control this by using special codes in the filename. For example:
/gallery/front-door/{0:dddd}/{0:hh-mm-ss}.jpg
Example resulting file: /gallery/front-door/monday/12-00-30.jpg
You can also specify a counter using {C} which will reset to 0 when it hits Counter Max defined below. For example:
/gallery/pic_{C}.jpg
Example resulting file: /gallery/pic_0.jpg
Quality: The quality of the uploaded/saved image. Lower quality means smaller file sizes and faster transfers.
Overlay Text: This overlays the specified string at the bottom of the image.
Counter Max: Using {C} within your filename, iSpy will substitute in a counter that will increase with each save/upload to this value and then reset.
Display on Website
To display the feed on your website just copy and paste the following HTML code into your webpage (you'll need to modify the _targetimage variable to point to the image you are uploading). This will only work if you have specified a static path to your uploaded image (ie it continually over-writes the same file).